 TabShop POS eBook is a complete and practical guide for entrepreneurs and small business owners looking to take control of their sales, inventory, and customer management using TabShop, the flexible mobile Point-of-Sale (POS) system.
From the first steps of setting up your store to more advanced techniques like synchronizing data with Google Sheets or connecting to WooCommerce, the book walks you through how to build a professional, efficient, and scalable POS system entirely from your tablet or smartphone.
Each chapter is organized with practical examples so you can apply every concept immediately in your own store environment. Instead of abstract theory, you get real workflows for daily sales operations, product updates, inventory checks, and checkout optimization.
The guide also covers common setup mistakes and shows proven ways to avoid them, helping you save time during onboarding. Whether you run a cafe, food truck, retail shop, or small restaurant, the content is written to match real business needs.
You will learn how to organize products and categories for faster cashier handling, improve invoice quality for customers, and create a reliable process for tracking revenue and stock movement. These improvements can help reduce errors and speed up service during busy hours.
For growing businesses, the eBook explains how to connect TabShop with external systems and how to prepare your setup for multiple devices. This makes it easier to scale from a single terminal to a coordinated team setup without losing control over your data.
By the end of the book, you will have a clear action plan for implementing TabShop in a structured way, from first configuration to advanced automation. It is designed as a hands-on reference you can return to whenever you expand your menu, add new staff, or optimize your store processes.
- Create a Product
- Scan Product Barcodes
- Set up a Printer
- Print an Invoice
- AliPay Merchant QR Code Payments
- Invoice numbering
- Orders on multiple tables
- Manage your invoices
- Manage your taxes and discounts
- Business intelligence reports
- Restock products
- Change appearance
- Sync multiple devices
- Run a TabShop server on your Synology NAS
- How to unlock TabShop PRO features?
- Enable and print callout numbers
- ESC/POS printer, cutter and cash drawer control codes
- Print custom QR codes on your invoices
- WooCommerce integration
- Manage your Stock Inventory with Google Sheets
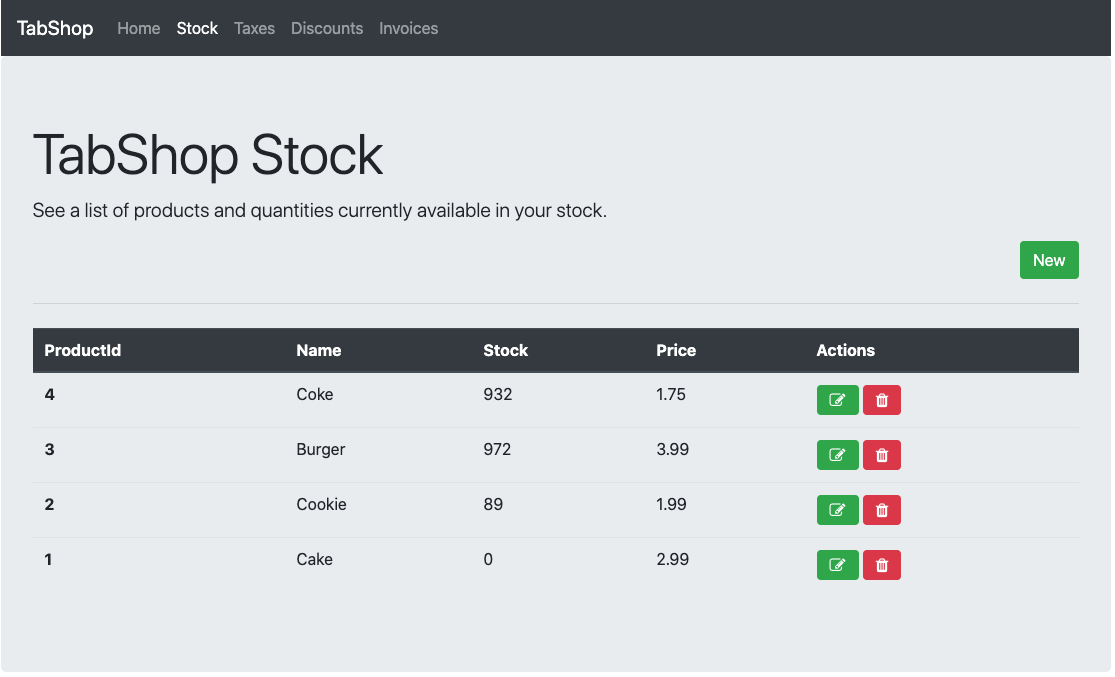
Add a Product
A core feature of a Point of Sale (POS) system is managing inventory, processing transactions, and generating invoices.
TabShop includes four example products (e.g., burger, cookie) upon installation, allowing you to explore its features. These sample items can be removed and replaced with your own inventory as needed.
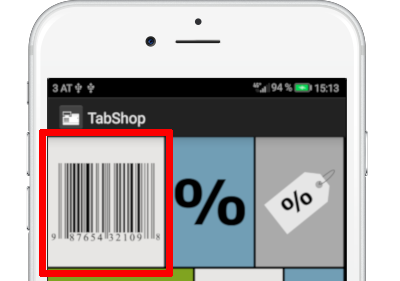
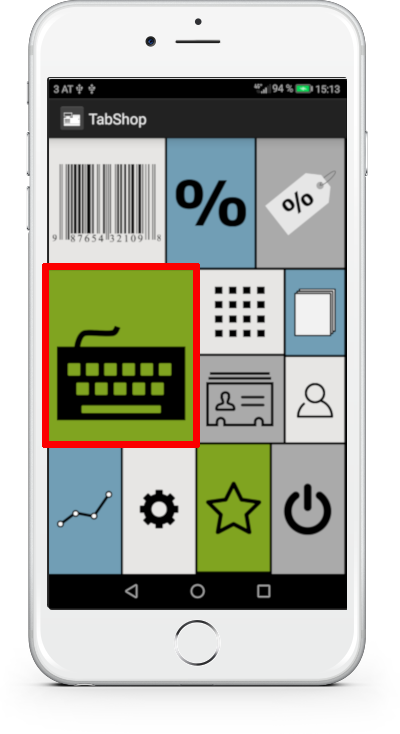
To create a new product, navigate to the Product Management View by clicking the barcode tile on the home screen.
The Product Management View displays all the products defined in your system, including those with zero stock. This allows you to restock or manage inventory as needed. Below is a screenshot of the Product Management View.
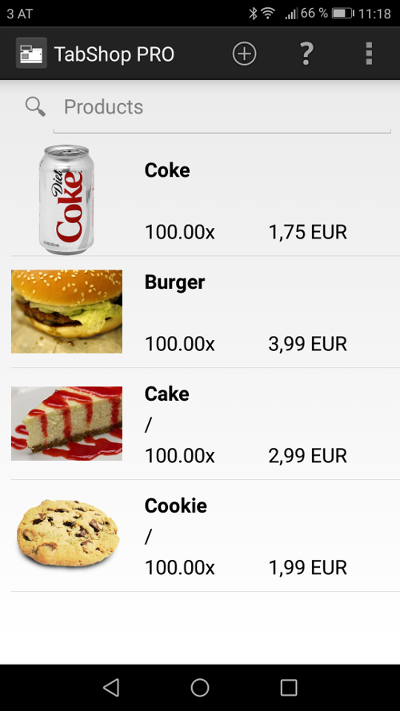
A click on a product does open a context menu that allows users to delete, modify or promote any of the listed products.
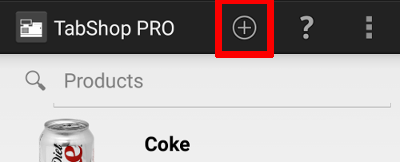
Lets create a new product, by clicking the product management view action on top that shows the plus icon, as shown below.
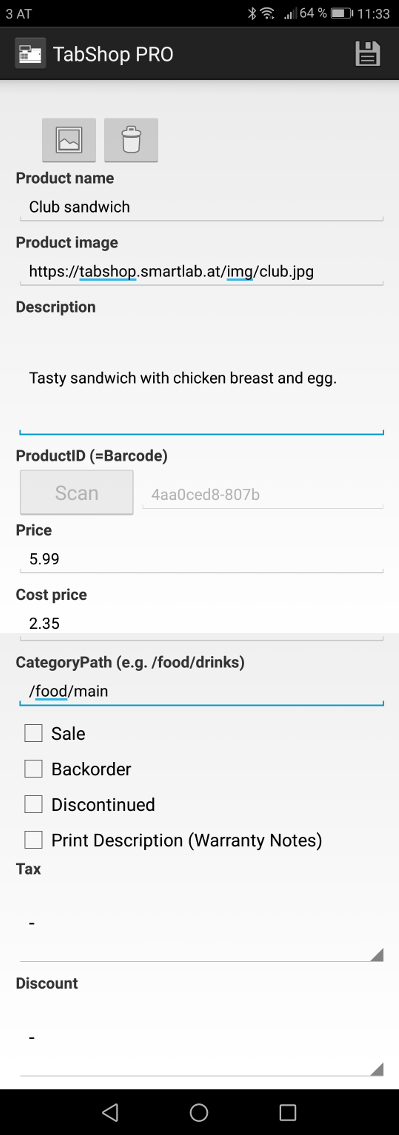
The product creation and edit screen is shown, that allows users to enter all the necessary details about a product. First, choose a good and short product name. This name is then used within the cashier screen when taking orders. So, a short precise name has to be preferred.
Then an optional product image can be defined. There are two alternatives for selecting a product image. Option one is to select a local image on your phone, while option two is to enter a URL that refers to any image in the public internet. If you select to choose the URL option, you have to make sure that TabShop is able to fetch this image and that the URL starts with either the prefix 'http://' or 'https://'. As an example you can use our club sandwich image that you can find under following address 'https://tabshop.smartlab.at/img/club.png'.
The product description is optional and allows the shop owner to add some more notes about the listed product.
One of the most important product attributes is the product id which has to be unique across all your listed products. It uniquely idetifies your product, so in many cases of retail shops you can directly use the barcode. TabShop automatically generates an unique id once you create a new product, but you can override that either by scanning (click on Scan button) your products barcode or by using your own manual unique identifier.
The price defines the sales price (which includes all taxes) that is shown to the customers of your shop or restaurant.
The cost price defines your own costs for that specific product. This own cost information is not really relevant for your customers or for invoice prints, it is used only for business intelligence purposes to optimize the revenue of your business.
Stock quantity specifies how much of that product you have available. Whenever you sell any amount of that product, TabShop will automatically decrease the overall stock quantity of that product until you reach zero quantity. When zero quantity is reached, TabShop will hide that product from your cashier screen, except for backorder marked products that are still shown, even if they are falling below zero stock quantity.
The category of a product defines in which group it is stored. For example you put all your drinks into the '/drinks/' category. The category attribute is hierachical, so you can define a tree of product groups by simply using the '/' character to separate them. A hierachical group could be '/food/sweets/', and so on. If you want to rename a complete group you have to use the main views action 'Rename group', which renames a given category name with a new one within all the products that are listed within your store.
The product attributes define additional characteristics of your products. If a product is marked as 'Sale' it will show up under a special sale category in the cashiers screen, to promote its sale. 'Backorder' attribute allows a product to still be sold, even if its quantity falls below zero stock. 'Discontinued' markes products that should no longer be sold and 'Print description' marks products where the description field should also be printed on the invoice.
The optional tax and discount dropdowns do allow you to define a standard tax and discount percentage for a given product. The taxes as well as discounts have to be defined upfront within the dedicated tax and discount management views. Taxes are automatically calculated from sales price and shown on the printed customer invoice. Discounts are a way to reduce the sales price before the tax is calculated on the invoice. Discounts are also shown on the printed invoice.
Scan product barcodes
TabShop offers multiple ways of scanning your product barcode. First of all you have to use the products barcode as product id when creating the product within TabShop.
Wireless Bluetooth Barcode Scanner
Once you used the product barcode as unique product id within TabShop, you can either type the code within the cashier screen product search field, or you can use a wireless Barcode reader, as shown below to automatically scan your products. The wireless Bluetooth barcode reader therefore acts as alternative keyboard input within the TabShop search text field. Mind that for Bluetooth barcode scanning you DON'T have to click on the TabShop scan button, you just click into the search text field and start scanning with your external barcode scanner.
Phone Camera Scan
Alternatively, you can also click on the scan symbol beside the search text field which opens your installed QR and barcode scanner app right on your phone. Mind that QR scanning with your phone as much slower than an external Bluetooth barcode scanner.
Set up a printer
TabShop offers multiple options for attaching a printer to instantly print invoices. One way is to use a direct network connected printer, such as a typical HP-Office LaserJet while another way is to directly connect a Thermal Printer by using a Bluetooth connection. Propably the most widespread configuration is to use a portable thermal printer along with your smartphone or tablet device.
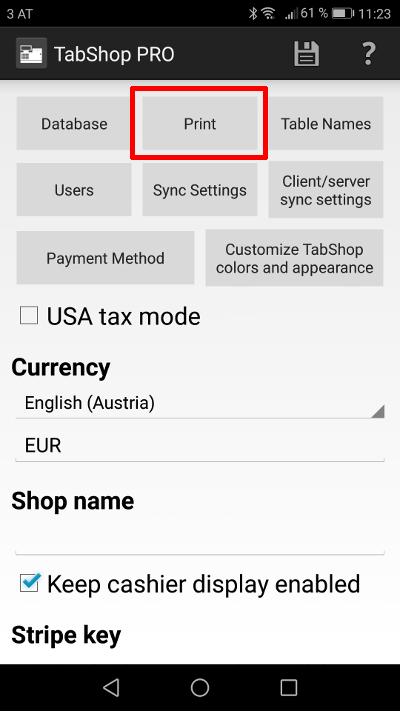
Configure your network printer
Lets start with configuring your network printer, by opening the settings view as shown below and by clicking the 'Print' settings button.
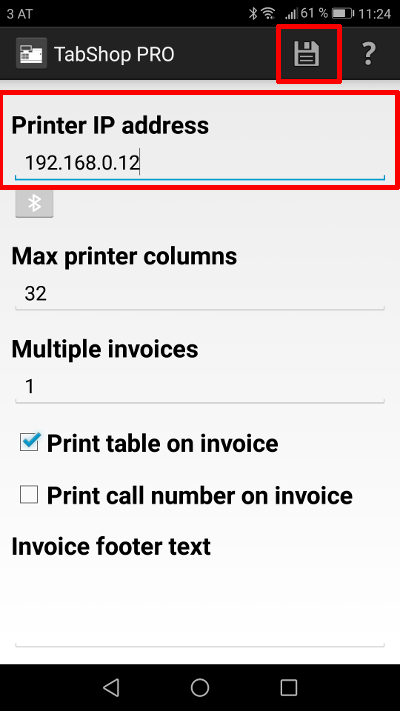
Once print settings view is open, enter your printers local network IP address (e.g.: 192.168.0.10) as shown below. Don't forget to save the changes by clicking the top right save button. If your network printer is accessible from your TabShop device, each checkout process will trigger an invoice print on your printer. During checkout you just have to select the print checkbox.
Please make sure that your network printer has to support direct ASCII print on network port 9100.
Configure your thermal Bluetooth printer
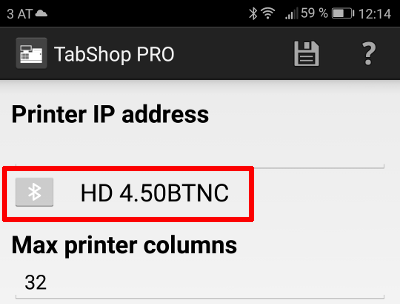
To set up a Thermal Printer it is necessary to pair your Bluetooth printer with your Android device within the Android system. Please mind that the pairing process has to be performed in Android system and not within the TabShop settings.
After your Bluetooth thermal printer is successfully paired with your Android system, you can click on the Bluetooth button in TabShop print settings to select the printer, as it is shown below. Mind that in case of a thermal Bluetooth printer you must not enter a network printer IP address!
Enable advanced ESC/P commands with your thermal printer
Most thermal printers do offer advanced commands for controlling special functionality, such as a built in invoice cutter or to print a stored logo. This command set is called Epson Standard Code for Printers or in short ESC/P as it was first introduced by Epson thermal printers. Those ESC/POS commands are very specific for each printer vendor, but some of those commands still follow the original Epson standard controls.
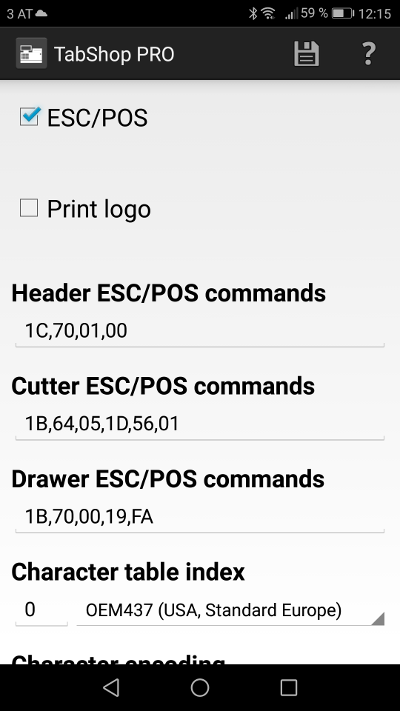
In case you own a ESC/POS enabled thermal printer, you can enable the ESC/POS checkbox in TabShop to access the advanced command set. Some default commands are already predefined, such as to initialize the ESC/POS printer with 1B,40. In general, ESC/POS commands are specified by using comma separated hexadecimal numbers, such as 1B or 40. Please refer to your own printer vendors manual to find out what specific commands your model supports.
Also the selection of a character set is something that you can do in ESC/P in order to print non ASCII invoice characters, such as Indonesian or Chinese characters in your product names.
See below a list of well known ESC/POS commands you can use within TabShop:
1B,40 = Initialize the ESC/POS printer
1C,70,01,00 = Quick print a logo that is stored within the NV Ram on the printer
1B,64,05,1D,56,01 = Epson cutter command
1B,70,00,19,FA = Epson cash drawer command
0A = Line feed
Printing Invoice QR Codes in Your Invoices
To enable QR codes on your invoices, follow these steps:
- Navigate to Settings > Print Options.
- Enable the option to print invoice QR codes at the bottom of each PDF and image invoice.
You can customize the QR code content using predefined placeholder fields. These fields allow you to include dynamic information on the invoice:
{invoiceNr}: The invoice number.{total}: The total amount of the invoice.{checkoutType}: The checkout type.{checkoutStatus}: The checkout status.
You can also include custom text or use your own URL with these placeholders to provide additional functionality, such as enabling customers to revisit or confirm their invoice online.
Example ConfigurationIn the Print Invoice QR Code field, you can enter a URL or custom text with placeholders. For example:
http://yourshopdomain.com?invoice={invoiceNr}&total={total}&checkoutType={checkoutType}&checkoutStatus={checkoutStatus}
This setup generates a QR code that, when scanned, redirects customers to a page containing invoice details.
By customizing this field, you can streamline invoice management and enhance your customer's experience.
Print an invoice
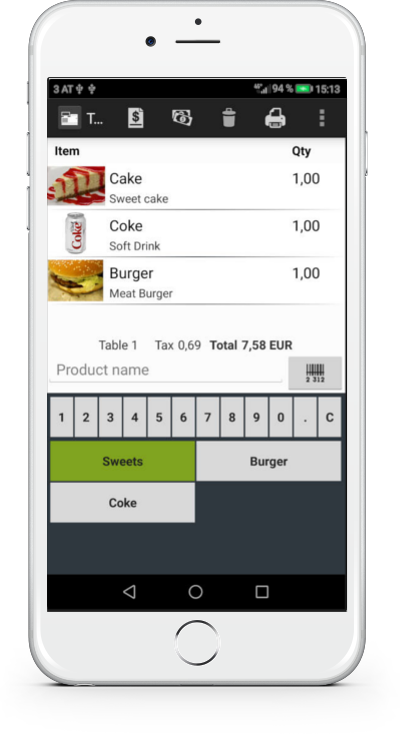
The cashier screen is the main view for taking orders for individual tables or to checkout and print invoices for your customers.
Click on the cashier symbol within the startscreen to open the cashier screen as shown below:
The cashier screen consists of a list of ordered items and a product selection area right below. By using the number buttons, variable amounts of product quantities can be selected. Just push a 3 followed by the product to put 3 times the product onto the order list. Same for decimal amounts where you push 3 followed by the '.' and 5 to select 3.5 times a product.
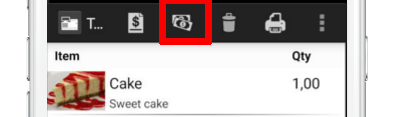
As the number of available products can be huge, a convient search field allows you to search for a product name or its identifier instead of using the product buttons below. A click on the barcode button allows you to scan a barcode from a product by using your smartphones camera. In case you are operating a Bluetooth barcode scanner, you can focus the search field instead and simply scan the products barcode. In case you are using a Bluetooth barcode scanner, do NOT click on the scan button within the cashier screen, instead just click on the product name search text field and scan the product with your barcode scanner.
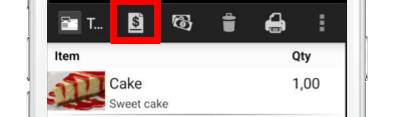
Once your customer finishes the order, use the actions on top of the screen to checkout the order and print an invoice.
Use the quick cash checkout for a quick, cash based checkout that immediatly prints the invoice on the configured printer.
Use the checkout action to further select the checkout and print alternatives.
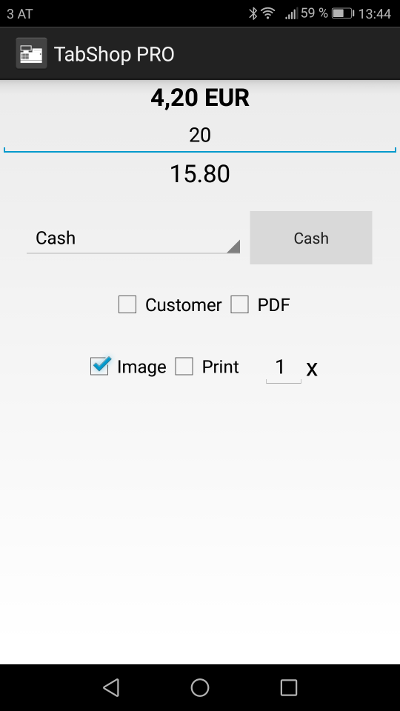
Within the checkout view the cashier can select which checkout method the customer prefers. Options are cash, credit card Stripe or PayPal checkout. Stripe and PayPal checkout do charge the customers credit card directly, while the other checkout options are for statistical purpose only. In case of cash checkout, you type in the amount given by the customer, and TabShop automatically shows how much return the customer gets. A click on customer does allow the specification of a names customer for statistical purpose and to specify the customer name directly on the printed invoice.
Printing options include to print the invoice as PDF, as an image (which is the preferred option for exotic character sets) and to use the confugured thermal printer. TabShop also allows you to specify the number of invoice prints that should be done. See below a screenshot of the checkout view:
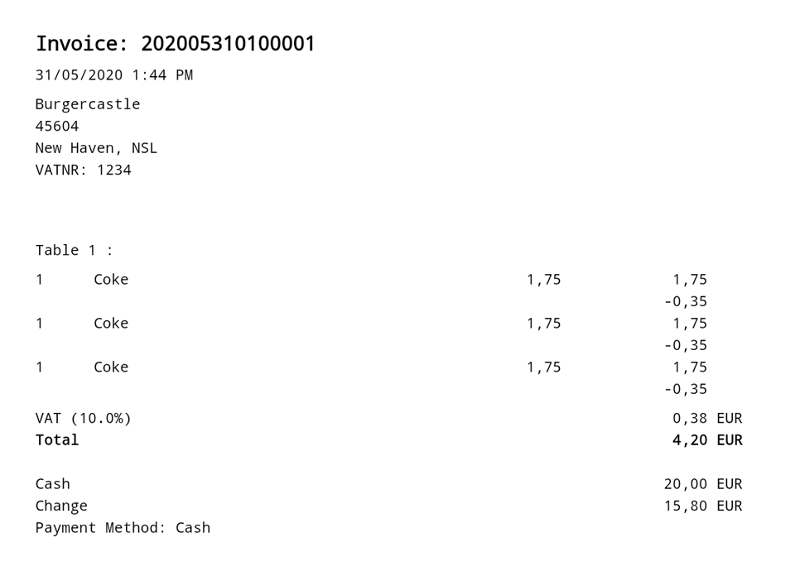
After selecting image print TabShop will open the finished invoice print as image, as shown below. The image can then be shared with any of your standard Android apps, such as Facebook, WhatsApp or traditional email. The image can be printed on a standard printer as well.
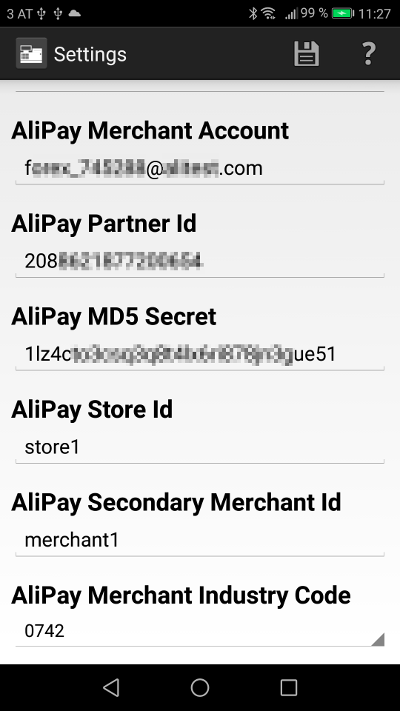
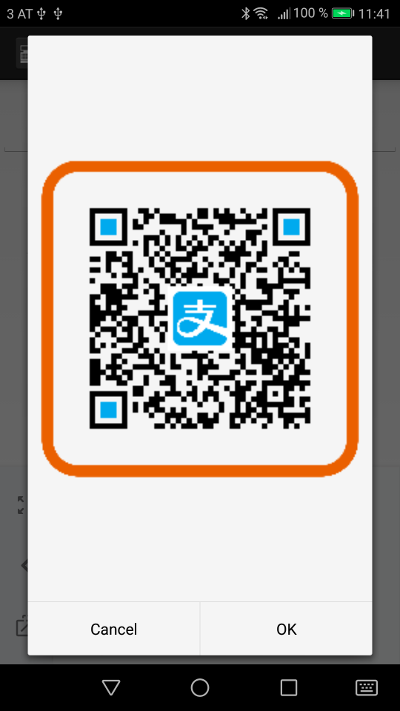
AliPay Merchant QR Code Payments
TabShop directly supports to configure and use AliPay for Merchant QR code payment transactions. Therefore, you have to configure following AliPay information within your TabShop settings view:
- Partner id: AliPay partner identifier (PID)
- Merchant account: email address of your AliPay partner account
- MD5 secret: Your MD5 secret for signing all AliPay payment requests
- Shop id: Identifies individual shops (only characters, numbers and underscore allowed)
- Secondary merchants id: only characters, numbers and underscore allowed here)
- Secondary merchants industry code: Secondary merchant industry code (allowed codes)
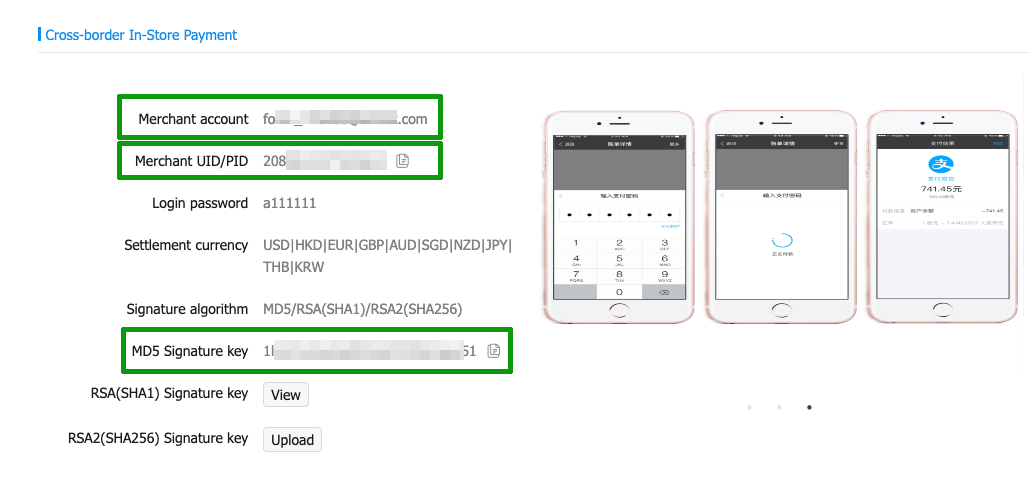
Configure all those AliPay settings within the TabShop POS settings as shown below:
Once configured, you can select AliPay as one of the invoice checkout options that allows you to show your customer a direct AliPay Merchant Payment Transaction QR code, that your customer can use to pay the invoice, as it is shown below:
Invoice numbering
All your checked out invoices are sequentially numbered. The format of the invoice numbers is as follows: Year Month Day terminalnumber + 5 digit incremential number. An example is shown here: 2020 05 32 01 00001, so the invoice was checked out at terminal with the number 01 and it was the first invoice. The terminal identifier can be configured within TabShop global settings view, to distinuish between invoices coming from multiple TabShop terminals.
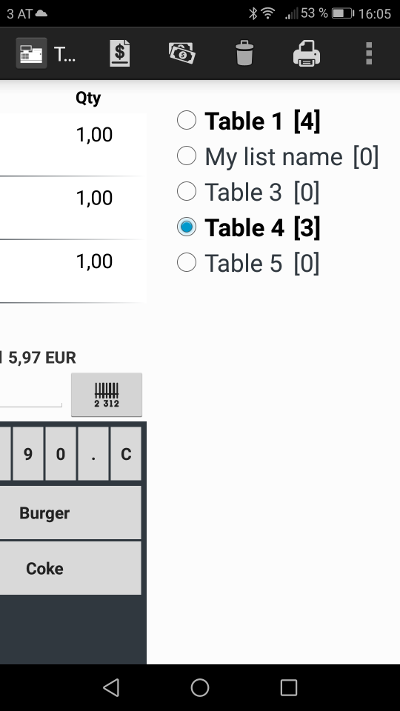
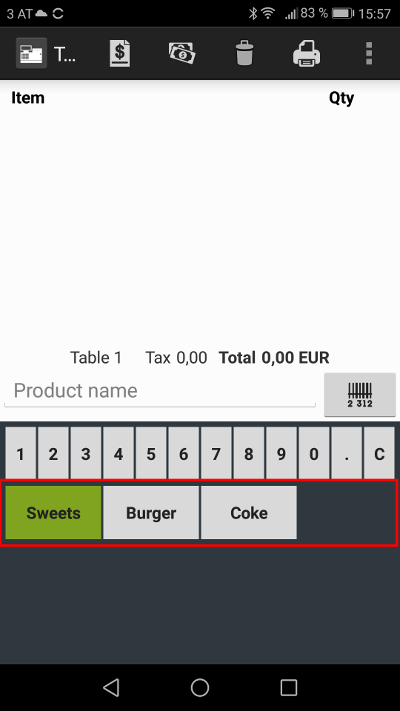
Take orders for multiple restaurant or bar tables
No matter which kind of business you are running, it is always convenient to manage multiple different order lists in parallel. Typical use-case is to take orders for multiple tables within a restaurant or bar, or to manage the individual orders of multiple hotel rooms within one POS terminal.
Within your TabShop app you can seamlessly switch between multiple open orderlists by a simple right swipe within the main cashier screen. TabShop is initialized with 5 orderlists, called 'Table 1 - 5', but you can easily rename those tables to your own need. Maybe you want to name your tables differently 'Door table', or you want to get rid of the term table completely.
Whenever you add an item to one of the configured tables (orderlists), you see the number of active orders within the table list view, as shown below.
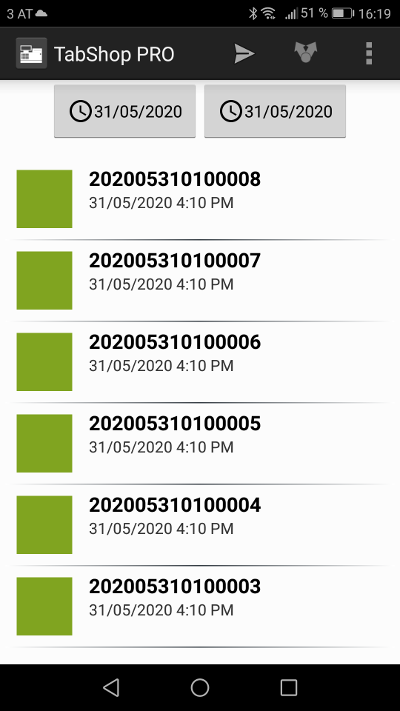
Manage your invoices
Use the invoice view to list all checked out invoices within a selected period of time. The invoice view can be accessed through the blue invoices icon from main startscreen, as shown below.
Multiple actions are supported within your invoices list. Just click on an invoice (multiple selection is possible) and use the top main action menu. You can for example reopen the invoice and print a copy of the invoice, or you can cancel and refund the invoice. Another important function within the invoice view is to share or export the stored invoices as CSV export.
Manage your taxes and discounts
TabShop offers two, identical views for managing individual taxes and discounts. Discount percentages are reducing the sales price of products before the tax is calculated.
Each defined tax or discount does offer a short text title, that is also printed on the invoice. A tax or a discount has to explicitely applied to a product within product management view. By default no tax and no discount applies to a newly defined product.
Use the plus sign to add a new tax within tax view and the same action menu entry to add a new discount in discount view.

Once you defined your new local tax, it is shown within the list of already available tax rates, as it is shown below.

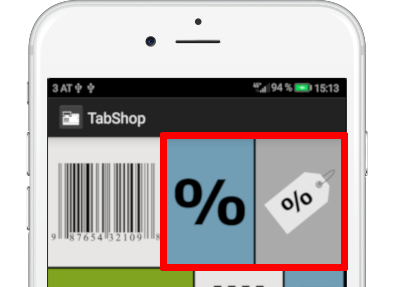
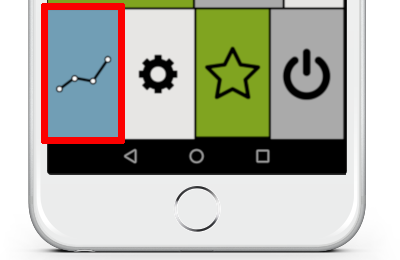
Optimize your Business by using TabShop Business Intelligence
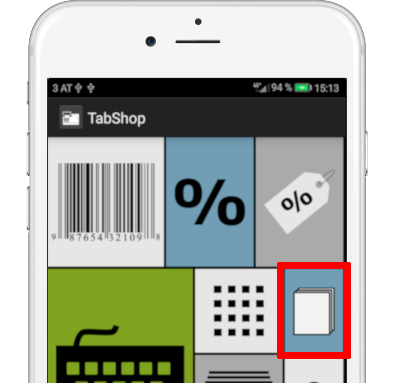
Within TabShop several reporting and Business Intelligence views are visualized. To view a breakdown of your current days report as well as the overall account report, click on the chart tile within the startscreen.
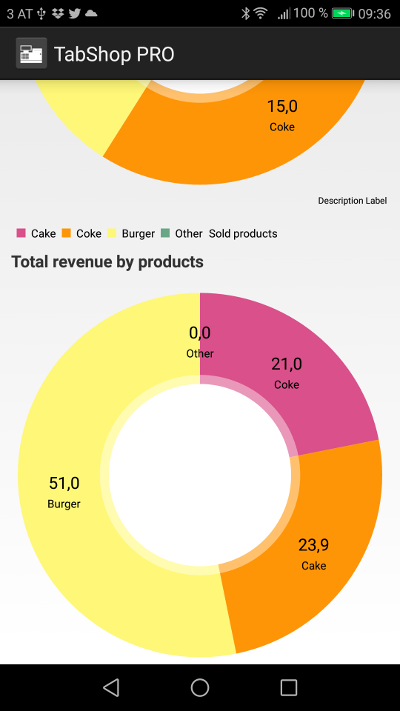
The first two barcharts within the business intelligence view are summarizing the days results and the account total results, split by total cost prices, discounts, taxes, revenue and finally your profit. The profit is the result of total result minus the taxes and own costs that you had.
The BI view also offers main actions for resetting the day results or to reset the complete account results. A dangerous action is to reset all invoices, which will delete and reset the complete invoice database!
The business intelligence view also gives you access to daily reports and monthly reports exported as pdf documents, so that you can store them away for post review purposes.

TabShop PRO additionally offers a chart view that allows the user to select any given time period in order to show charts and summary reports of the most important key performance indicators (such as most sold products, revenue split by product, etc.).
Restock products and goods
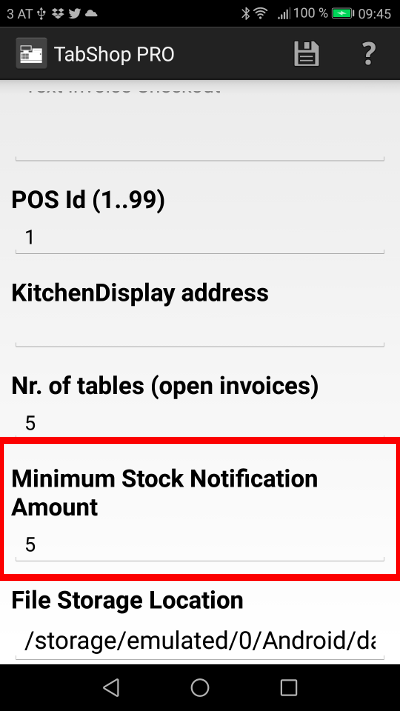
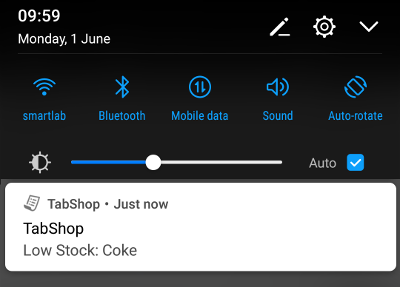
Once you got a lot of business, its likely that a product will run out of stock. TabShop offers a convenient notification method that sends you a reminder BEFORE the product will run out of stock. You can customize the threshold of remaining product stock that should trigger the notification within the global TabShop settings, as shown below.
TabShop will send you a convenient warning on low product stock directly within the Android notification center, as shown below.
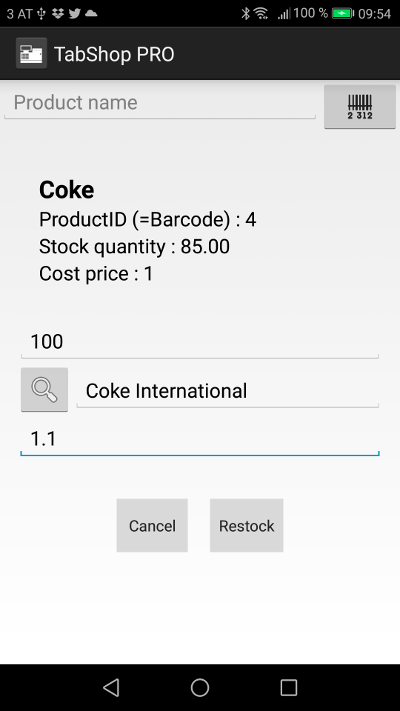
When your supplier arrives with new stock, you simply switch to the restock view within TabShop to add and register the newly arrived quantity of the product and also adding the possibily changed own cost of the new batch of products. The new own cost will be applied to the remaining product stock (which had a cheaper own costs price) by applying a new weighed average own cost price to the product stock to keep the true own cost price.
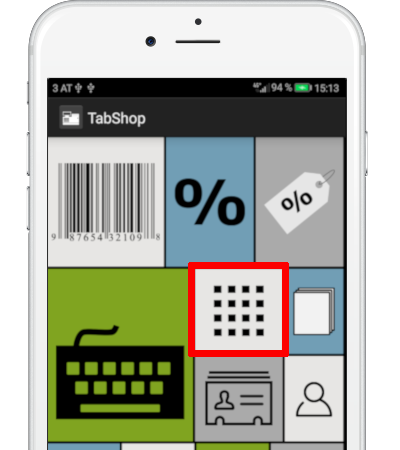
Once you are in the restock view of your cashier system, you need to select the product first that received the restock quantity. Then either select an existing supplier or enter a new one and register the new cost price below.
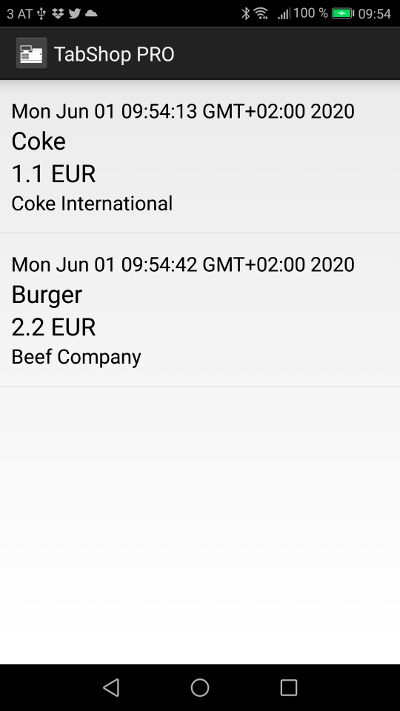
Furthermore, the supplier history is registered and shown within the restock view.
How to change the appearance of the TabShop user interface?
TabShop comes with predefined colors for all the important user interface elements, such as tile buttons or cashier screen buttons. In case that the default TabShop green and blue color scheme is not fitting well to your own shops colors, you can easily change those colors within the setting view.
Navigate to global settings and click on the 'Customize TabShop colors and appearance' button, as it is shown below.
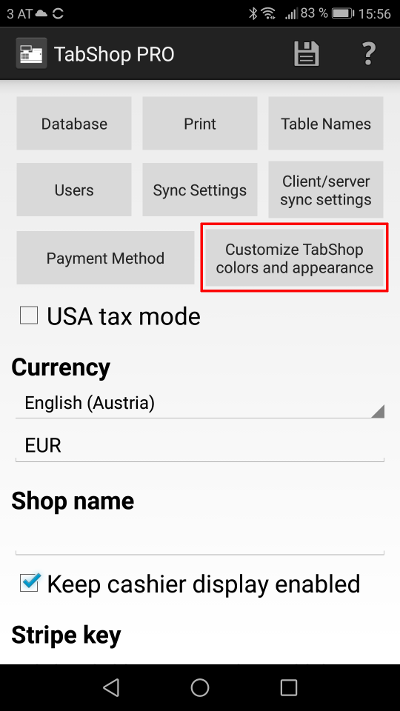
The appearance settings view, as shown below, allows you to set your own individual color scheme for your point of sale system.
Within those settings you can also define how many button columns you would like to use within the primary cashier screen.
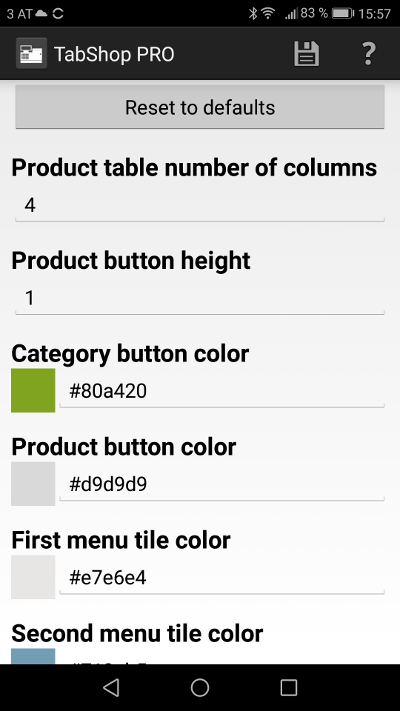
Within this example below, 4 colums were defined for the main cashier screen. The list of products is then shown in four columns as it is shown within the screenshot below.
How to set up Synchronization between multiple TabShop devices?
TabShop is built to operate in standalone mode, even when network or internet connectivity is not given at all.
In case that you have to operate multiple TabShop devices within your restaurant or shop and you want to manage available stock quantities centrally, you can use the client-server synchronization feature.
Navigate to global settings and click on the 'Client/server sync settings' button, as it is shown below.
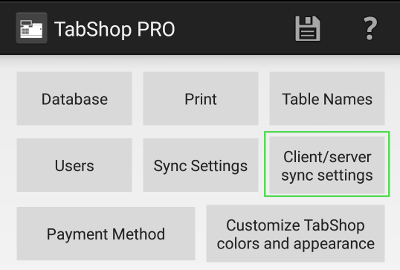
Within the client-server synchronization settings you can choose between two modes: the client mode and the server mode. Operate your device in client mode if you want the device to receive stock from a central server. Typically, you operate multiple clients and one server. Once you choose the device to run in client mode you have to specify the servers URL address. For TabShop it does not matter if you run another Android device in server mode or if your choose to run a central TabShop server as a Docker container.
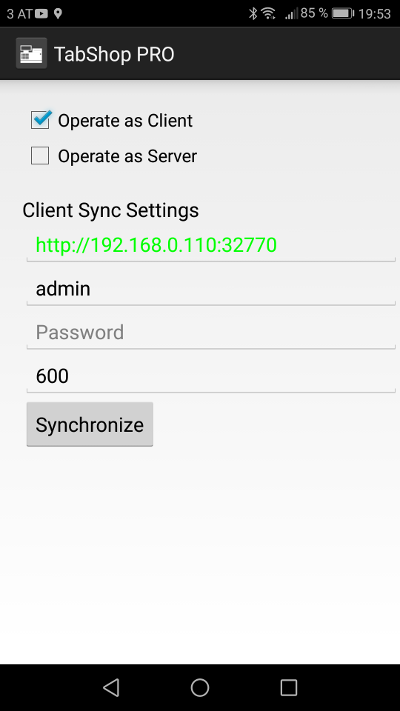
In case you choose to run one of your Android devices in server mode you have to configure the server devices local URL address within all your client devices.
If you do run a TabShop server as Docker container, you have to configure your Docker containers address within all your Android TabShop client devices.
Use the POS id settings within all your clients to specify which number the single device has. This is important to avoid a clash of the ongoing numbering of invoices. All invoices checked out on the POS with id 1 will have the 01 within the ongoing numbering. See an example below:
202010130100021 invoice number from POS id 1
202010130200021 invoice number from POS id 2
How to run your own TabShop Server?
One of the most convenient ways of managing your stock product quantities within your backoffice and to collect all the checked out invoices in a central place is to run TabShop server as a Docker container. You find the free TabShop docker container at Dockerhub, as shown below:
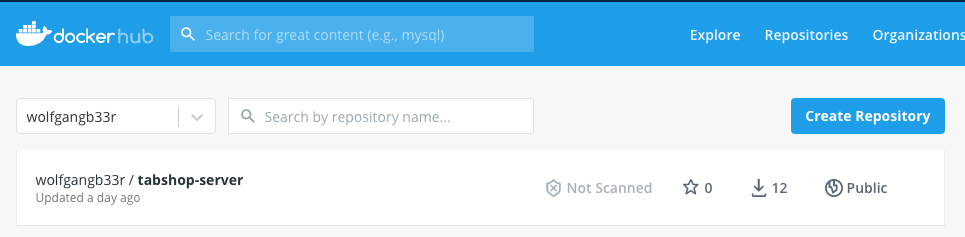
The setup of the TabShop server is as user friendly as possible. You simple pull the Docker image and run it by mapping a local directory as '/tabshop' into your container. TabShop server will then store all the incoming data and invoices into your local directory.
The docker container reads following environment variables:
- adminUser: Sets the admin user name.
- adminPwd: Sets the admin user password.
Once your own TabShop server is up and running, you will find your servers landing page as shown below:

You can now conveniently follow the product stock change online and manage your available products.
How to run a TabShop server on your Synology Diskstation?
Propably the most convenient and reliable way of running a TabShop server is to set up and run the TabShop server as a Docker container on your Synology Diskstation, as it is shown below:
Running your server on a Synology Diskstation has major benefits, as there are:
- You dont need any additional server running and you propably need a reliable backup network disk anyway
- TabShop server can directly write its data and invoices to your local network disk
- You can directly run a job for copying TabShop data and database for recovery and backup on your network disk
- Synology 2 bay device runs as RAID, which means you dont loose invoice data if one of the disks fails!
- No manual management effort for running the server as it is provided as a Docker container
Now lets see how you can run your TabShop server on your Synology NAS.
First, login into your Diskstation web ui in order to install the Docker package within your package center.
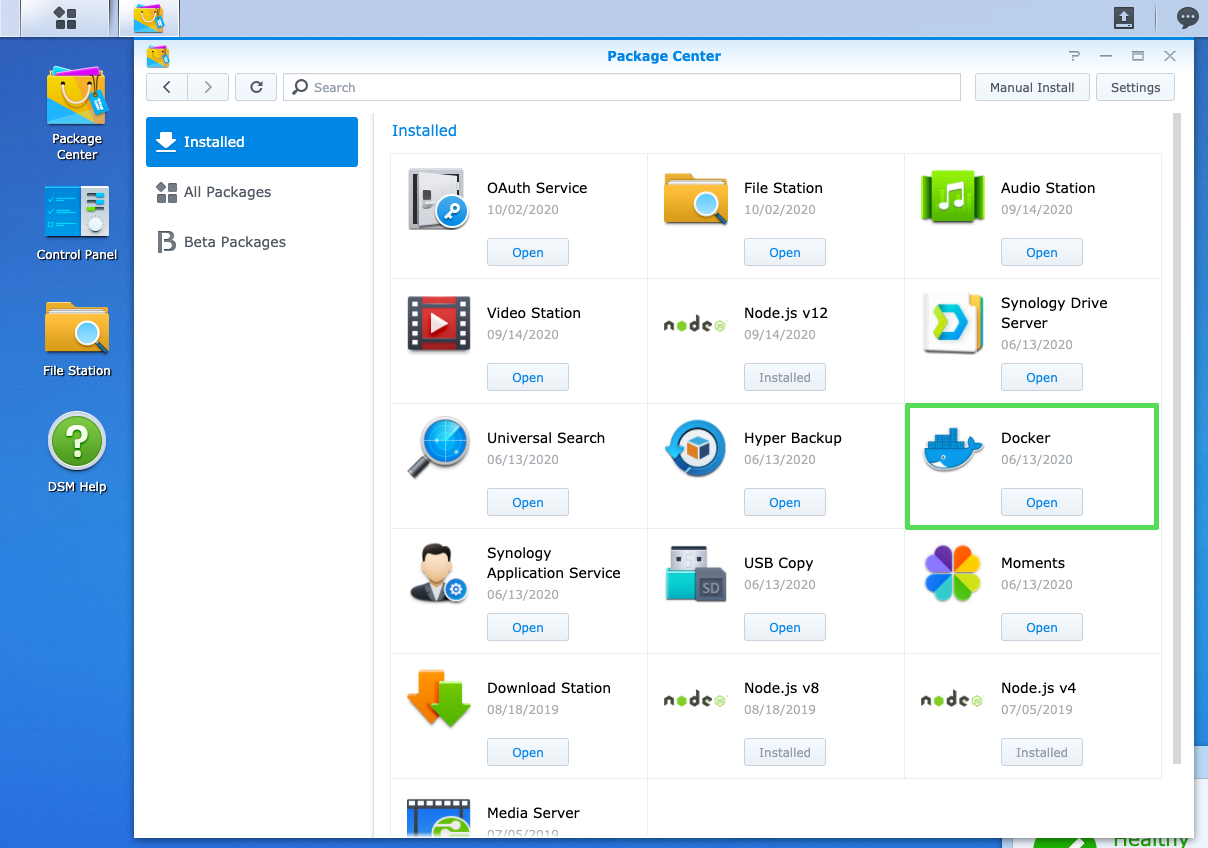
Then click on 'open' the Docker package and go to the Docker registry to search and download the official TabShop docker image as shown below.

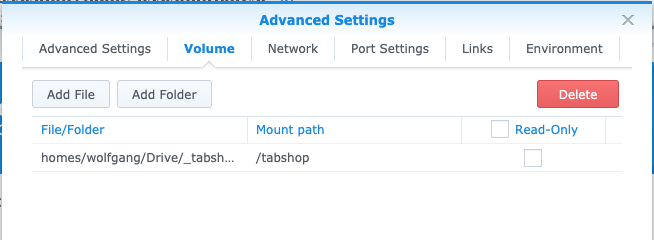
Map a local storage directory
Then map a local directory on your NAS as the containers '/tabshop' folder and start an instance of the TabShop docker image.
Finally, start the docker image, which you can then access on a local port directly on your Synology NAS.